How to Perform a Chicken Necropsy
- May 7
- 7 min read
Updated: Jun 11
A practical step-by-step guide to finding and identifying problems in your flock.

Whether you’re responding to a production challenge or just checking flock health, a necropsy is a practical way to understand what’s happening inside your birds.
The goal isn’t always to identify a single issue. In many cases, it’s about learning what normal looks like so you can quickly recognize when something is off. That understanding helps you catch changes earlier and respond with more confidence.
With just a few basic tools, you can perform a necropsy yourself and gather useful information, not only to guide your own decisions, but to share with your veterinarian, nutritionist or technical team as you work through next steps.
Here’s our simple 7-step process, along with a guided video from a poultry specialist.
1. Prep
A. Before You Begin
A necropsy is a troubleshooting tool.
You use it when something changes in your flock or when you want to double-check that birds are healthy and functioning normally. It helps you connect what you’re experiencing in the barn, like reduced production or changes in behavior, with what’s happening inside the bird.
Even small observations can be useful. Keeping notes and tracking what you find can help you identify patterns over time and provide better information if you need help from a veterinarian or technical support team. It also reinforces the importance of keeping solid production records, like egg production, feed and water intake, mortality and behavior, because those numbers often provide the first clues that something has changed in the flock.
B. Tools & Setup
You don’t need fancy equipment to perform a necropsy. Many producers successfully do this with tools they already have on hand.
Basic supplies include:
Sharp scissors or kitchen shears
Gloves
A clean work surface
Bucket with soapy water or disinfectant
Towels or paper towels
Notebook or phone for recording observations

One helpful step is dipping the bird in soapy water before starting. This keeps feathers from flying everywhere, makes the process cleaner and helps reduce the spread of external pathogens.
Remember, this process doesn’t need to be perfect. The goal is to observe, learn and gather information.

2. External Examination
Before beginning the internal exam, take a moment to carefully observe the bird’s external condition. Many problems can be identified without making a single cut.
Start at the head and work your way down the body.
A. Head and Face
Healthy birds typically show:
Bright, clear eyes
Pink, firm comb and wattles
No swelling or discharge
Clean nasal passages
Cloudy eyes, swelling or nasal discharge can indicate respiratory challenges. Lesions inside the mouth may suggest feed-related issues such as mycotoxin exposure.
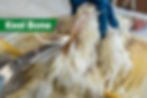
B. Feather Cover
Feather condition provides quick insight into overall flock health and behavior.
Watch for:
Missing feathers
Signs of pecking
Scratches/bruises
External parasites
Overly soiled feathers
C. Vent Area
The vent can tell you a lot about both production status and digestive health, so it’s an important area to check during every necropsy.
Look closely at the following:
A dirty vent may indicate a digestive system challenge, such as diarrhea or poor gut health
External parasites may be visible in this area
Look for any lesions, swelling, redness or irritation, as they could be indicators of pecking or infection
For layers, you can determine if a bird is actively producing by palpating between the pubic bones. If you can fit approximately three fingers between the pubic bones, the bird is likely in lay. If the pubic bones are close together and the area is firm, it’s a strong indicator that the bird is not actively producing.
D. Legs and Feet
Check for:
Swelling in joints
Irritation or sores - such as bumblefoot
Signs of dehydration - such as leg scales that appear tight, dry or pulled closely against the leg, and skin that does not snap back quickly when gently pinched (stays tented or returns slowly)
Healthy leg scales should lie flat against the skin. Raised or rough scales can indicate external parasites.
3. Opening the Bird
Once you complete the external exam, you can begin opening the body cavity.
Start by making a small incision just below the keel bone. From there, carefully pull back the skin to expose the breast muscle and internal organs.
As you take up the skin of the bird, pay attention to:
Muscle color
Body condition
Fat levels
Any unusual lesions or discoloration
Breast muscle should look similar to boneless chicken breast from the grocery store, consistent in color and texture. Small abnormalities may not be serious on their own, but they are worth noting.

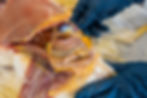
If a fat pad is present, like the image above, it can be a useful indicator of body condition and energy balance.
In a healthy bird, you should see a moderate, evenly distributed fat pad, not excessive, and not completely absent. Fat should be lightly present around the abdominal area and organs, but it should not obscure your view or make organs difficult to distinguish.
When fat becomes excessive, it often shows up as a large abdominal fat pad and thick, yellowish fat deposits surrounding the organs. This can indicate excess energy intake or reduced activity. While some fat is normal, too much can signal that birds are consuming more energy than they are using, and over time it may begin to impact health and performance.
Excessive fat pad may be associated with:
Reduced egg production or persistency
Fatty liver syndrome or pale, enlarged liver
Lower feed efficiency
Increased sensitivity to heat stress
Reproductive challenges, including internal laying or egg quality issues
4. Organ-by-Organ Walkthrough
After pulling back the skin and examining the breast muscle, body condition and fat pad, you can move deeper into the bird. To access the organs, continue opening the bird from the same area below the keel bone, carefully cutting through the body wall and along the rib cage to expose the body cavity.
Once the cavity is open, pause before removing anything. Look at the position, color and overall appearance of the organs, and note anything that looks abnormal (spots, lesions, inflammation, fluid, etc.).
A. Digestive System
The digestive tract is one of the most important areas to evaluate during a necropsy because many health and performance issues start in the gut.
Key organs to examine include:
Crop
Proventriculus
Gizzard
Small intestine
Ceca
Large intestine
Pancreas

A healthy digestive tract typically shows:
Smooth, consistent tissue color
No major lesions or bleeding
Normal intestinal contents and consistency
No visible parasites
The gizzard should be muscular and firm because it is responsible for grinding feed. Seeing some small stones or grit inside is normal and expected.

When examining intestines, it’s important to open sections and look inside, not just outside. Some issues, like worms, may only be visible internally.

B. Respiratory System
The respiratory system includes:
Trachea
Lungs
Air sacs

Healthy lungs should appear:
“Homogenous in color (bright red-pink)
Spongy, but firm
Free of swelling and exudate
Air sacs should be:
Clear
Thin
Transparent
Cloudy air sacs or fluid buildup can indicate respiratory disease or environmental stress such as dust or ammonia.
C. Reproductive System
In laying hens, the reproductive system provides valuable insight into production status.
Healthy laying birds typically show:
Multiple yellow follicles
Developing eggs
Normal tissue color - no dots, faded/transitioning colors or lesions
If developing follicles are absent, the bird may not be actively laying.

You may also observe misshapen or hemorrhagic follicles, free yolk material in the abdominal cavity, or inflammation and infection in the oviduct. These are all abnormalities that can indicate a challenge and should be recorded and discussed with a veterinarian or consultant.
D. Liver and Immune Organs
The liver is one of the first organs you’ll see after opening the body cavity.
A healthy liver should be:
Dark red
Smooth
Consistent in color
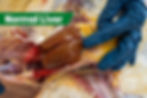
A pale or yellowish liver may indicate excess fat or metabolic stress. Or spots may indicate diseases like spotty liver.
The spleen and kidneys should also be:
Uniform in color
Free of lesions
Normal in size with no swelling or inflammation
These organs help support immune function and overall health, so changes here can signal underlying disease or nutritional imbalance.

5. Common Findings and Why They Matter
During necropsies, a few findings show up more frequently than others.
Understanding what they mean can help you respond quickly and appropriately.
Worms
Parasites are common, especially in cage-free or flocks with outdoor access.
Intestinal worms can inhabit multiple sections of the digestive tract, and different worms prefer different locations. It is important to note the appearance of the worm(s) and the location in the digestive tract they are observed. Anything unusual should be examined carefully and documented.
Spots or Lesions
Spots, bruising or discoloration often indicate inflammation, infection or tissue damage.
A simple rule to remember: Spots inside birds are not normal.
These findings should always be recorded and monitored.
6. When to Act and Consult Someone
A necropsy provides useful information, but it doesn’t always provide a final diagnosis.
You should consider contacting a veterinarian or poultry specialist when you see:
Multiple birds affected
Unusual mortality
Severe lesions or swelling
Rapid production decline
Findings you don’t recognize
Even taking photos can be helpful. Many professionals can review images and guide next steps remotely.
Where to Send Samples
If further testing is needed, common sample submissions include:
Intestinal sections
Liver tissue
Lung tissue
Whole birds
Your veterinarian or diagnostic lab can provide guidance on what samples are most useful. Some great places to send samples are the University of Minnesota and Iowa State. Make sure to carefully read all of the guidelines and regulations before sending samples.
7. Cleanup
Once the necropsy is complete, proper cleanup is essential to protect the rest of your flock.
Best practices include:
Disposing of the bird properly - securely double-bagging the carcass and placing it in the trash, or deep burial to prevent disease spread.
Cleaning tools with disinfectant
Washing hands thoroughly
Sanitizing the work area
Bottom line, performing a necropsy isn’t about becoming a veterinarian. It’s about understanding your birds. Sometimes you’ll find a clear problem. Sometimes everything will look normal. Both outcomes are valuable.
The more familiar you become with what healthy birds look like on the inside, the faster you’ll recognize when something changes, and the sooner you can take action to protect your flock.
Watch the Full Necropsy Walkthrough
Want to see the necropsy performed step-by-step instead of just reading about it? Watch the full video tutorial with Ralco Poultry Specialist, Alea Gigliotti, as she walks through external evaluation, opening the bird and examining each major organ system.
Want to Learn More About Chicken Necropsies?
Join our upcoming webinar, How to Conduct a Chicken Necropsy and What it Can Tell You, on Tuesday, June 30, 2026, at 10:00 AM or 3:00 PM CST.
Dr. Tim Broderick and Alea Gigliotti will walk through what to look for during a necropsy and how findings can help guide next steps for your flock.